Showing posts with label mps 803. Show all posts

Tuesday, February 21, 2023

MPS803 Poster Generator

Some time ago I restored old Commodore MPS 803 dot matrix printer. It is quite basic 7 dot printer. When reading user manual I noticed that this printer have bitmap graphics mode available. This printer is able to print 80 column text using 6x7 dot fonts so after short calculation I realized that I should be able to print images with 480 horizontal resolution which sounds quite nice in comparison to C64 graphics resolution. So I get idea to make simple application that can generate PRG files which I can load on actual C64 machine and print posters on my old MPS803 printer.

Well... I was not aware how hard printing on this type of printers might be.

Let check if we can fit into C64 RAM. Each byte contain data for 7 dots.
So 480(cols) * 480(rows) / 7(dot matrix row data) = 32kB. We are good.

Lets start with some assembly code that would be able to sent correct commands to the printer.
Below you can find listing of the program I wrote. This code use small trick to send big memory block to the printer. It use self modifying code. It increase address in 'lda imageX' instruction in loop.


// 480x588 BMP Printing on MPS803 printer.
// ----- @Start@ -----
:BasicUpstart2(start)    // 10 sys$0810
start:
    lda #4          // open 4, 4, 0
    tax
    ldy #0
    jsr $ffba
    lda #0
    jsr $ffbd
    jsr $ffc0
 
    ldx #4          // print#4,
    jsr $ffc9
    lda #8          // chr$(8) 
    jsr $ffd2
    lda #13         // chr$(13)
    jsr $ffd2

    // BMP1 block
load1:
    lda image1
    beq !end+
    jsr $ffd2
 
    clc
    inc load1 + 1
    bne !skip+
    inc load1 + 2
!skip:
    jmp load1
!end: 
 
    // BMP2 block
load2:
    lda image2
    beq !end+
    jsr $ffd2
 
    clc
    inc load2 + 1
    bne !skip+
    inc load2 + 2
!skip:
    jmp load2
!end: 
 
    ldx #4          // print#4,
    jsr $ffc9
    lda #15         // chr$(15)
    jsr $ffd2
    lda #13         // chr$(13)
    jsr $ffd2
    lda #10         // chr$(10)
    jsr $ffd2
    lda #4          // close 4
    jsr $ffc3
    jmp $ffcc
 
.pc = $1000 "BMP1"
image1:

.byte 0 
.pc = $c000 "BMP2"
image2:

.byte 0
  
At start I should choose image to test. What image is most popular for testing? How I could forget. Of course. Lenna.


I wrote simple program that loads any image then scale it to correct size and convert it to black and white image. I implemented feature to change contrast and brightness with real time preview to get best results. Below you can find example result.
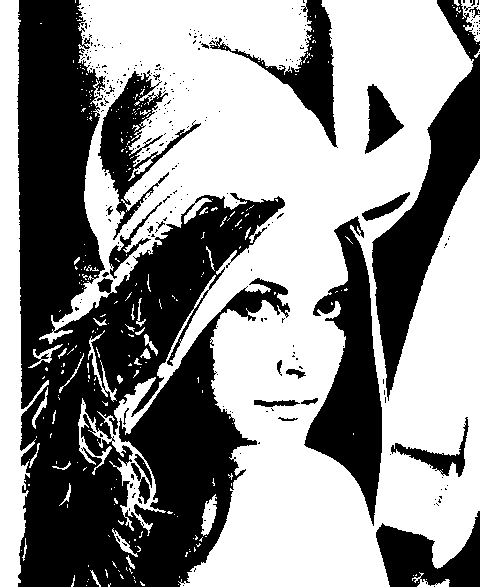

I lost a lot of colors details of course. Since we have quite good resolution of prints I decided to implement basic dithering algorithm. First choice of course Floyd-Steinberg. Below you can find result image.

Looks good. Right? Then I try to print this image on MPS 803 dot matrix printer. How I was disappointed with results.

 
Contrast was so bad that it was almost impossible to tell what is on picture. This was one big gray rectangle. I decided to experiment with other types of dithering and try to increase contrast as much as possible. I implemented "fade" feature to image preview in my software to get as much final result preview as I can.

If you are interested in used dithering algorithms check this two link below:

http://www.tannerhelland.com/4660/dithering-eleven-algorithms-source-code/
https://web.archive.org/web/20131022220241/http://michal.is:80/projects/image-dithering-in-matlab/

Below you can find shots from my application. Best results I get using Artkinson dithering and adjust contrast and brightness to the levels where I get as many solid b&w regions as possible.  This looks like b&w image but with some blend on the edges. Each image need to be adjusted to get good results. Using live preview is quite handy here.


This is time for first quite good print. Results are below.


Image is much better however still not so great contrast because of not fully black ink used on printer tape. This was original old stock tape so not much we can help on hardware side. After some time I decided to print image using same 2 passes on one image. This should make black color more dark. Below are results from printing.


As a result of my journey I get small tool to print posters using old C64 and MPS 803 dot matrix printer. I hope it will be useful for somebody thet have this printer still. Below whole history of my prints on this device so far.


Tuesday, January 15, 2019

Commodore MPS 803 - Fixing Printing Head


Some time ago I bought old, dirty, untested MPS 803 printer on my local ebay like portal. After replacing ink tape cartridge I noticed that only 4 from 7 printing head pins are working fine. Also motors was not able to automatically move the tape. So printer require some repair work to be done. I decide to give it a try and make this printer work again.


MPS 803 inside.

At start I open the case and investigate inside elements. Everything was in really good condition. There was no visible corrosion which was good information since the outside of the case was really dirty. I believe this printer have long life in office or workshop where every couple of days it was cleaned by "fresh" wet cloth. This make case really dirty after some time.

Carriage motor is also powering ink ribbon feeding mechanism. For some reason motor is to weak to drive this which cause the carriage to stop randomly with printer error light on.
To solve ink ribbon feeding issue I disconnect gear that was powering the mechanism and fead it by hand using small knob on ink tape cartridge. Not the perfect solution but works.

After further checking I notice some broken tracks in ribbon going to printing head but unfortunately this was not the only one issue.

I desolder ribbon and check coils. Some of them were broken. After looking at printing head I decided that I will try to dismount it and maybe I will be able to fix the coils. This was a little like crazy idea but worked fine at the end.

Disassembled printing head.

I removed plastic cover and open printing head. I remove electro magnet blades. I carefully remove plastic part that keeps springy tappets pins that hit ink ribbon. This part also need some cleaning since two of pins was stuck by dry ink. I left with metal corpus and coils inside it. I removed coils and investigate them.


Removed coils, the case and first fixed coil.

The place were coils broke was output pins. So this bring me to conclusion that some driver outputs can be broken(shorted) or basically this was weak point of coil since there is only one wire there and heat can't transfer to anything else like in middle of coil. After checking driver signals using my simple Chinese digital oscilloscope I confirm that driver is working fine and broken coils was the fault here.

Driver signals for single coil.

Now started hard precise part. I resolder all coils leads and bring them outside the case using short wires. To my surprise I was able to fix all coils. I mount coils inside the case and carefully assemble the printing head. I melt part of plastic case to keep it in the place and my printing head was one piece again. I glue wires to metal case to not break them of by accident.  

Assembled printing head.

The last part to fix was the flexible ribbon wire. I decided to remove already broken ribbon and exchange it with bunch of twisted wrap wires. Maybe it is not the cleanest solution but will work for now. I solder it to cut plug of the flexible ribbon and from other side I solder it to printing head wires. 

Plug used to connect to the driver board.

New flexible wire "ribbon".

I bundle the wires on head and print some small cover to make it look better. Unfortunately I need to remove transparent part from case cover to allow printing head to move freely.
My printer was working again.  After cleaning the case it looks great. Maybe it is not 100% original device but at least it is functional and I can print something with it.

First prints in action.

Printing result.
It was pleasure to see how such printers works and how simple they are in general. I can imagine that I should be able to easy control such printer using Arduino only. Maybe this is an idea for another project.